

From 1968 to 1999 the oil pumps are all pretty much the same in respect to the check valve. The check valve is used to keep the oil in the oil tank when the engine isn't running. When the engine is running there is oil pressure that opens the check valve and allows the oil to flow through the engine. If the check valve wasn't there, all the oil in the oil tank would flow into the lower end of the engine. Then when you start the engine it blows it out the breather. This is called Sumping. If you let the bike sit over the winter and oil drains past the check valve, when you start it in the spring it will blow the oil out the breather. This is somewhat ok. It is when you let the bike sit for a couple hours or a day and it does this that it is a problem. My shovel used to do this. There were times when it would blow 1/2 quart of oil out the breather.
There is an old school "fix" where you take a drift and hammer and hit the check ball once firmly then replace the ball. This is suppose to seat the ball. I never cared much for working on my oil pump with a hammer.
Now this is a Brand New S&S oil pump and it should not be doing this. So off the oil pump came so I could figure out what was happening. What I found was a casting defect on the check ball seat. It had a small depression right across the seat. This was enough to be the cause of my problem.
There are tools specifically for cutting the seat. That adds time and money to the repair. Here is how I did it.
In this picture you see the oil pump body. The red arrow (1) shows the direction of pressurized oil flow. Note that hole leads directly to the check valve. Red arrow number 2 indicates where the check ball is installed into the pump body. It has a spring that presses the ball onto the seat, just above arrow number 1. When the oil is pressurized it lifts the ball off the seat and flows to the engine.
![Image]()
This is looking down into the oil pump body where the check ball goes. The red arrow (3) points to the check ball seat.
![Image]()
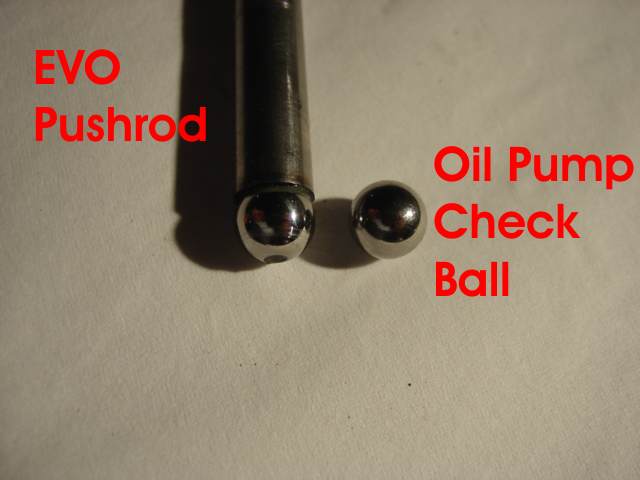
The check ball measures .375" (3/8" Bearing).
![Image]()
An EVO pushrod has round ball end that can be used as a lapping tool.
![Image]()
The ball end also measures .375"
![Image]()
Place the pump body in a vice with the top up. Note the vice has soft jaws and the oil pump body is protected further with a soft towel. Only tighten the vice enough to hold the part, do not damage the pump surfaces.
![Image]()
Next we need some lapping compound. I used a fine grit that would be used for lapping in valve.
![Image]()
I dip the end of the pushrod in the lapping compound. You don't want an excessive amount but it should be coated fairly well.
![Image]()
Place the pushrod into the pump body and rotate.
![Image]()
I place one hand on each side move them back and forth. After a 3 or 4 swipes lift the pushrod a little and set it back down and do 3 or 4 more. Repeat this 4 or 5 times.
![Image]()
Remove the pushrod and wipe the lapping compound off the end. Look closely at the wear pattern. You want an even wear pattern so you know you are getting the entire check ball seat. If it is just a hairline only the very edge of the seat was touched.
![Image]()
Clean the lapping compound out of the oil pump body and inspect the seat. If you are unsure of the seat you can use a blue dye to mark the seat and repeat the process. Then when you clean it out you should be able to clearly see the condition of the seat.
![Image]()
There is an old school "fix" where you take a drift and hammer and hit the check ball once firmly then replace the ball. This is suppose to seat the ball. I never cared much for working on my oil pump with a hammer.
Now this is a Brand New S&S oil pump and it should not be doing this. So off the oil pump came so I could figure out what was happening. What I found was a casting defect on the check ball seat. It had a small depression right across the seat. This was enough to be the cause of my problem.
There are tools specifically for cutting the seat. That adds time and money to the repair. Here is how I did it.
In this picture you see the oil pump body. The red arrow (1) shows the direction of pressurized oil flow. Note that hole leads directly to the check valve. Red arrow number 2 indicates where the check ball is installed into the pump body. It has a spring that presses the ball onto the seat, just above arrow number 1. When the oil is pressurized it lifts the ball off the seat and flows to the engine.

This is looking down into the oil pump body where the check ball goes. The red arrow (3) points to the check ball seat.

The check ball measures .375" (3/8" Bearing).

An EVO pushrod has round ball end that can be used as a lapping tool.
The ball end also measures .375"

Place the pump body in a vice with the top up. Note the vice has soft jaws and the oil pump body is protected further with a soft towel. Only tighten the vice enough to hold the part, do not damage the pump surfaces.

Next we need some lapping compound. I used a fine grit that would be used for lapping in valve.

I dip the end of the pushrod in the lapping compound. You don't want an excessive amount but it should be coated fairly well.

Place the pushrod into the pump body and rotate.

I place one hand on each side move them back and forth. After a 3 or 4 swipes lift the pushrod a little and set it back down and do 3 or 4 more. Repeat this 4 or 5 times.

Remove the pushrod and wipe the lapping compound off the end. Look closely at the wear pattern. You want an even wear pattern so you know you are getting the entire check ball seat. If it is just a hairline only the very edge of the seat was touched.

Clean the lapping compound out of the oil pump body and inspect the seat. If you are unsure of the seat you can use a blue dye to mark the seat and repeat the process. Then when you clean it out you should be able to clearly see the condition of the seat.


